 View mode settings: Includes 5 modes as the figure. The ��original�� button is designed as a 'Push to view' button, push it to show the original and release for the previous view mode. Double click the 'color as background' button for changing its colour. For photos too dark to see the edge, the 'Light mode' can be checked.
Edge optimizing: This option can be found as a button in the polygon modification tool, the free paint modification tool and the re-matting tool. It will specify the size of the area on the edge of modification, where the program will adjust the matting result (the mask) smartly to fit the real edge according to the colour changing between pixels. Here is an example.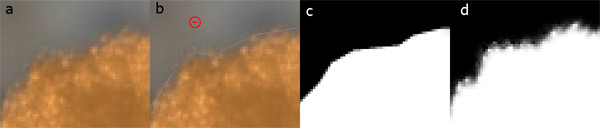 As the figures above, a) There is an object with a downy edge. b) Trying to use a polygon tool to subtract the background. c) Without edge optimizing, the result is just clean cuts.d) With edge optimizing, the mask will be optimized to fit the downy edge.
Polygon modification:The default status of this tool is 'Subtracting' mode, showing with cursor '-'.It means anything selected will be treated as background; Press 'Shift' to turn the status into 'Adding' mode with a cursor of '+' .The adding mode means the select area will be treat as foreground. Press 'Ctrl' will turn the polygon tool to 'Free select' tool instead.
Free paint modification: Choose a brush to add or subtract to/from the foreground. Press 'Shift' for the subtracting mode, which works as an eraser. Set the opacity of the brush to a low value will make the manually painting more easy to control.
Locally re-matting tool: This tool will matting a local area, with the selected local foreground and background colours around. It includes 2 statuses, colour sampling status and matting status. In colour sampling status, move the cursor to the foreground area, where 'F' is shown on the cursor, and click to collect a foreground colour as a candidate. Move to the background area, where 'B' is shown on the cursor, and click to collect a background colour as a candidate. You can collect 6 pairs of candidates at most. If at least 1 pair of candidates is collected, the tool enters matting status. In matting status, paintings on edge will re-matting the area by choosing out the best candidate pair and calculating the alpha value based on it. Press 'Shift' to swap to colour sampling mode, "right-click" to reset all candidates and select again.
Desaturation tool: When the background color reamines on the edge of the object you can use this tool to remove the colour (to grayscale). First, click the colour to specify the hue value, then paint to remove saturation. Right click to reset the colour. If you want to change it to another color instead of grayscale, you can click on the 'Tint' color button, and click on the image or double click the button to select one. In tint mode, any pixel you paint will be changed to a color with the specified hue and value.
Feather tool: Paint to feather the mask.
Area optimizing tool:
Select out an area and change/optimize the mask in it. The program provides 2 options for now.
Option 1, If you know the edge of the object shall be clear, but somehow the matting algorithm outputs a wrong result with mistakes. You can choose the option 'Shall be simple edge'. Then the program will use an alternate algorithm, which is based on a trained neural network (AI), to generate a new result. The AI is trained specifically for matting the objects with clear edges, so the result shall be a better choice in most cases.If the result is worse, you can always undo it.
Option 2, You can manually adjust the curve of the mask/alpha channel of this area to make it look better.
