The usage is simple; use the colour picker tool to click on the background, then the program will calculate the mask for you. There are several parameters:
- Sensitivity: Drag the slider to control the range of hue where the colour shall be treated as transparent/background.
- Feather: Add feather effects to make the mask smooth, default 0.
- Optimize edge: Make mask on object edge more accurate if the result contains the background colour on edge, try setting this value.
- Reduce related colour: In some photos the background light will reflect its colour on the foreground. For example, if a person wears white clothing and stands in front of a blue background. The light of the blue may tint the clothing to blue. This will cause a semi-transparent on clothing. This option can reduce the effects.
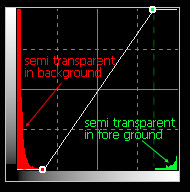
- Curve box: Adjust mask after matting. It is the curve for the mask that follows the general curve operations. The histogram on background is the histogram of the mask channel. Normally, It is used to make the result more clear with a curve as the figure on right shows.
If the matting works well for the photo, you can use the 'Batch chromakey' function by clicking on the robot icon and the same parameters will be applied on the same serials of the photo and save the results to a PNG file with the mask.
When the matting results have defects, you can use 'General tools for matting' to refine them. Especially when the result still remains in the background colour, you can use the 'Desaturation' tool to remove it.

